

Reports.
An overview of the reports available in Screaming Frog for granular, precise analysis.
An overview of SEO Spider’s reports: crawl overview, redirects, canonicals, pagination, hreflang, orphan pages, insecure content, structured data, PageSpeed, HTTP headers, cookies and crawl path. For each one, what it’s for.
Opportunity reports
Screaming Frog has invested heavily in recent years in updating the spider tool, and the available “Reports” have grown along with it. The tool lets you go to town with data exports, providing a whole set of dedicated documents to analyse most issues in detail.
The documents are listed in the main menu and you can save them locally as ‘.csv’, ‘.xls’ or ‘xlsx’, or as ‘gsheet’ using Google Drive. In the latter case you’ll find them in the “Screaming Frog SEO Spider” folder on Drive.
Crawl Overview
This report gives you the data you see in SEO Spider’s side panel.
It’s a concise summary of the crawl, very useful as a first, top-down look at each tab and its filters.
Redirects
These documents focus on the redirects discovered during the crawl, identifying where the link comes from.
There are currently three reports available:
- All Redirects: shows every single redirect and flags any chains.
- Redirect Chains: includes URLs with 2 or more consecutive redirects, creating a dangerous “redirect chain”.
- Redirect and Canonical Chains: identifies URLs with at least 2 redirects and chains of “canonical” URLs.
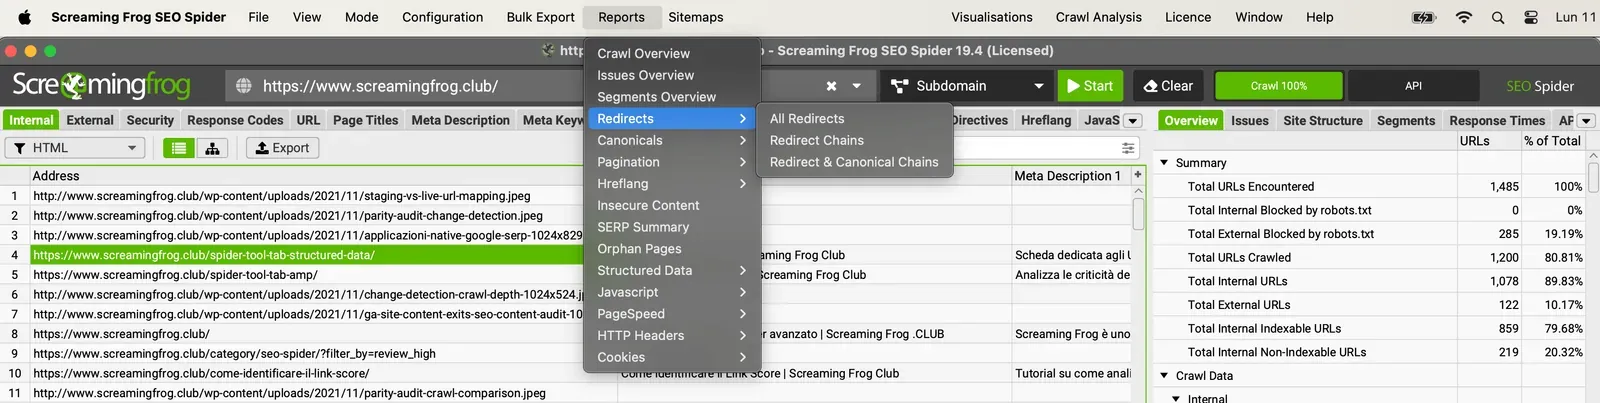
The “Redirect Chains” and “Redirect and Canonical Chains” documents are very useful for mapping chains of redirects and canonicals and “loops”, letting you see the number of hops along the way and the source URLs.
In Spider mode (1Mode›2Spider) these reports show every redirect discovered from a single hop upwards.
The document is split into columns and includes:
- the “number of redirects”.
- The type of chain identified:
- HTTP Redirect,
- JavaScript Redirect,
- Canonical,
- etc.
- Whether there are redirect loops.
If the report has no rows, the Spider found no loops or redirect chains that need optimising.
You can also download the ‘Redirects’, ‘Redirect Chains’ and ‘Redirect & Canonical Chains’ reports when crawling in list mode (1Mode›2List). In that case the document shows one row for each URL in the list.
If you tick “Always Follow Redirects” and “Always Follow Canonicals”, SEO Spider will keep crawling redirects and canonicals in list mode regardless of crawl depth. In short, it follows every hop to the final destination.
Note: redirect documents are especially useful during a website migration, to check that acquired ranking is passed on correctly and Crawl Budget isn’t wasted.
Canonicals
The ‘Canonical Chains’ and ‘Non-Indexable Canonicals’ documents highlight errors and issues with canonical link elements or HTTP canonical implementation.
1. The “Canonical Chains” report highlights any URL with more than 2 canonical links in a chain.
- URL A is “canonicalised” with a “canonical URL” pointing to URL B;
- URL B is in turn “canonicalised” to URL C.
2. The ‘Non-Indexable Canonicals’ report highlights errors and issues with canonical links. In particular, it shows all canonical links pointing to URLs blocked by robots.txt, returning 3XX, 4XX or 5XX status codes or anything other than a 200 ‘OK’ response.
This report also gives data on all URLs SEO Spider discovered through a “canonical” link that have no internal links from the site.
This shows in the ‘unlinked’ column with the value ‘true’.
Pagination
SEO Spider has two pagination reports:
- “Non-200 Pagination URLs”
- “Unlinked Pagination URLs”
These two documents are very useful for highlighting errors and issues with the “rel=prev” and “rel=next” pagination attributes.
“Non-200 Pagination URLs” identifies every URL whose “rel=prev” and “rel=next” attributes point to resources with a status code other than 200.
The “Unlinked Pagination URLs” report helps you find all URLs SEO Spider discovered through the “next/prev” attributes that have no internal links on the website.
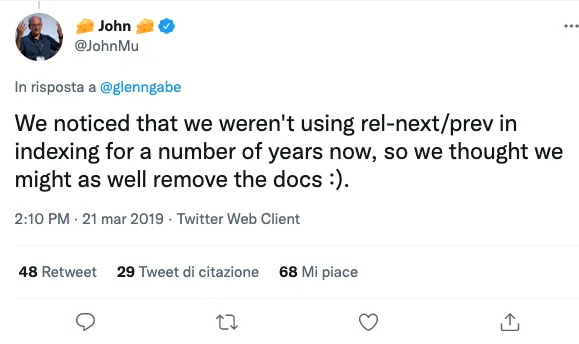
At the time of writing these attributes are no longer used by Google, but other search engines still use them.
Hreflang
The hreflang tag tells Google about the different language versions of a web page so it can serve the most appropriate one to users based on their browser.
Screaming Frog offers 7 downloadable documents, each with a different focus on the attribute:
- All Hreflang URLs: the most complete report, collecting all URLs and hreflang URLs, including the region and language codes discovered during the crawl.
- Non-200 Hreflang URLs: shows which pages have hreflang links to pages with a status code other than 200 (no response, blocked by robots.txt, 3XX, 4XX or 5XX responses).
- Unlinked Hreflang URLs: lists all URLs discovered through an hreflang link that don’t have a single hyperlink on the site (e.g. orphan pages).
- Missing Confirmation Links: shows which URLs are missing a “confirmation link”. For example, page A has an hreflang to page B, telling the search engine bot that A and B are two language versions of the same content, but B has no hreflang back to A, creating an inconsistency.
- Inconsistent Language Confirmation Links: shows confirmation pages that use inconsistent, different language codes for the same content.
- Non Canonical Confirmation Links: shows URLs with hreflang pointing to “non-canonical” elements. If you “canonicalise” an element you’re telling the spider that this content has a primary “canonical” version, so that’s the version your hreflang should point to.
- Noindex Confirmation Links: ideal for finding URLs with hreflang pointing to resources with a “noindex” attribute. Here too, sending the bot to “non-indexable” resources creates a huge contradiction between choosing to block a piece of content and asking for it to be served as a language version.
Orphan pages
Orphan pages are URLs that receive no internal links from other pages of the website and can’t be reached by the crawler because they’re isolated.
The “Orphan Pages” report lists URLs collected through SEO Spider’s connection to the Google Analytics and Google Search Console (Search Analytics API) APIs, or found in the XML sitemap, that don’t match any URL discovered during the crawl.
In short, it gives you the URLs SEO Spider couldn’t reach because there are no links to follow, or because the links are “nofollow”.
But if they have no links, why are they in the Google Analytics or Search Console databases?
They were probably indexed with a previous version of the site or from other sources such as XML sitemaps, or there are referrals pointing to them.
To collect data on orphan pages, just set up the APIs in SEO Spider’s configuration.
From 1Configuration›2API Access choose the APIs to connect and link a new or existing account.
At the end of the crawl you need to run “Crawl Analysis” to populate the relevant tab.
The sources available for checking orphan pages are:
- GA: the URL was discovered through the Google Analytics API.
- GSC: the URL was discovered in Google Search Console, through the Search Analytics API.
- Sitemap: the URL was discovered through the XML sitemap.
- GA & GSC & Sitemap: the URL was discovered in Google Analytics, Google Search Console and the XML sitemap.
Best practice: to optimise your SEO analysis with the Google Analytics 4 API, I recommend using landing page as the dimension and filtering on the “Organic Search” channel, so you get more relevant data and avoid login pages, e-commerce cart pages and so on.
Insecure Content
This report is very useful because it flags URLs with content considered insecure, helping you avoid browser security warnings that could drive visitors away.
The “Insecure Content” document lists all secure (HTTPS) URLs that load insecure HTTP elements, such as internal links, images, JS, CSS, SWF or external images on a CDN, social profiles and so on.
The report is particularly useful during migrations, to get a complete view of potential issues.
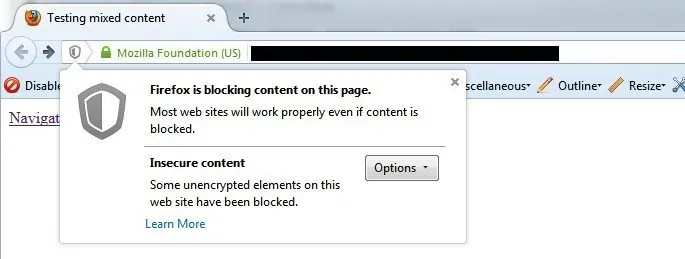
Here’s an example of the file where image destinations use “http” and aren’t considered trustworthy by the spider tool.

Structured data
As you know, structured data informs the search engine and, if handled correctly, brings huge visibility benefits through its various search features.
Screaming Frog gives you 4 reports to assess and fix structured data validation issues:
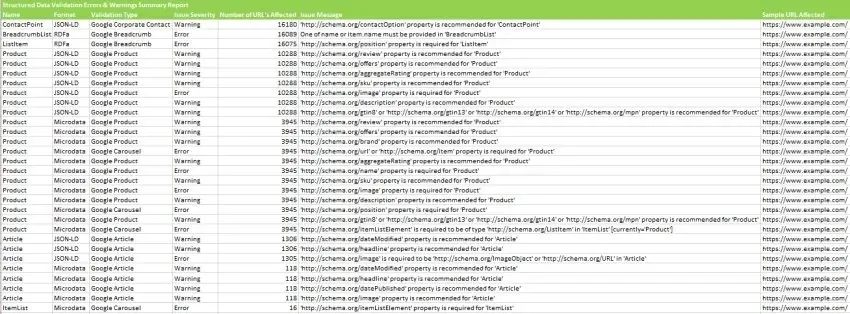
- Validation Errors & Warnings Summary: groups structured data by unique validation errors and warnings, showing the number of URLs affected by each issue, with sample URLs that illustrate the specific problem.
- Validation Errors & Warnings: shows every structured data validation error in detail for each URL, including the property name (Organization, etc.), the format (JSON-LD, etc.), the severity (error or warning), the validation type (Google Product, etc.) and the issue message (e.g. /review property is required).
- Google Rich Results Features Summary: groups data by the “Google Rich Results Features” detected in a crawl, showing the number of URLs with each feature.
- Google Rich Results Features: maps every URL against each available feature and shows which were detected for each URL.
PageSpeed
This report is based on the PageSpeed Insights API and provides all the main web page load time indicators, allowing a very precise diagnosis of anything blocking or hurting performance.
You enable it in 1Configuration›2API Access›3PageSpeed Insights.
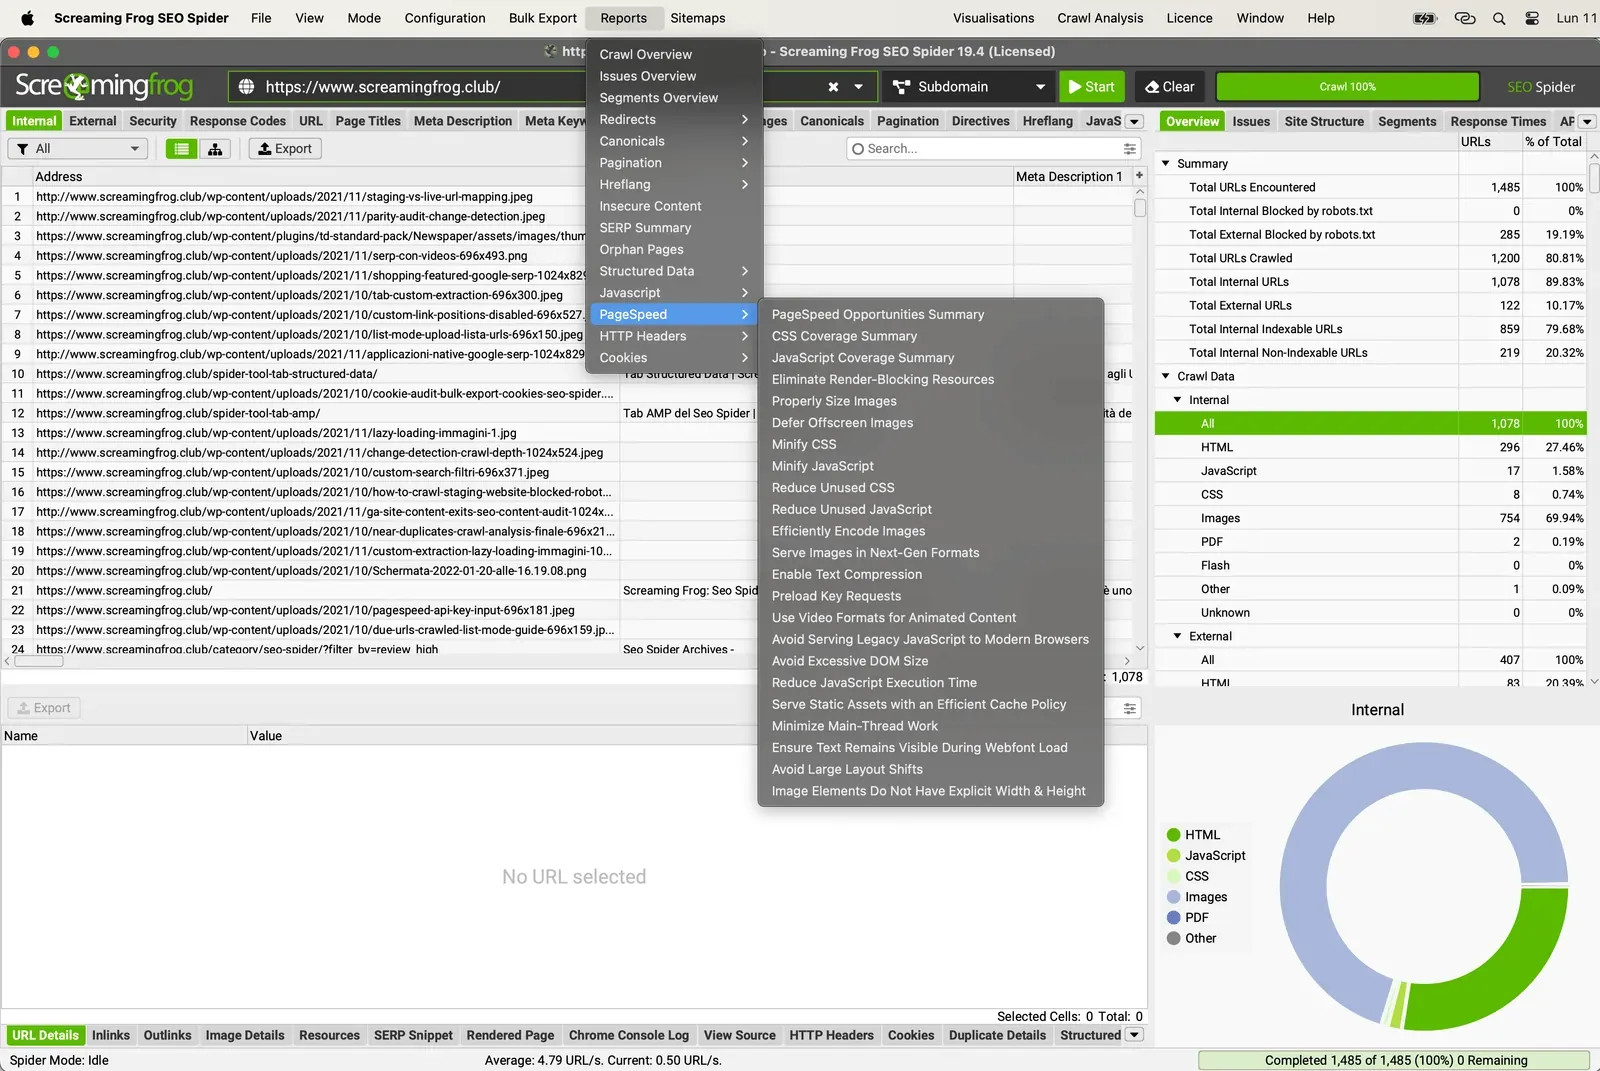
- PageSpeed Opportunities Summary: summarises all the unique opportunities found on the site, the number of URLs affected and the average and total potential savings in size and milliseconds, to help prioritise fixes.
- CSS Coverage Summary: shows the potential time saving from removing unused code from each CSS file loaded on the site.
- JavaScript Coverage Summary: shows how much of each JS file is unused during the crawl and the potential saving from removing the unused code.
HTTP Header Summary
This document gives an aggregated view of all HTTP response headers discovered during a crawl. It shows each unique HTTP response header and the number of unique URLs that responded with it.
To populate it, enable HTTP Headers in 1Configuration›2Spider›3Extraction.
You’ll find more specific details on URLs and headers in the “HTTP Headers” tab of the bottom window, and by exporting from 1Bulk Export›2Web›3All HTTP Headers.
Alternatively, you can query HTTP headers directly in the “Internal” tab, where they’re added as separate columns.
Cookie Summary
The “Cookie Summary” report shows an aggregated view of unique cookies discovered during a crawl, considering their name, domain, expiry, secure and HttpOnly values.
It also shows the number of URLs on which each unique cookie was set.
To use this report, just enable Cookies in 1Configuration›2Spider›3Extraction.
Don’t forget to enable JavaScript rendering too, for an accurate view of cookies loaded on the page via JavaScript or pixel image tags.
This aggregated report is extremely useful for GDPR privacy compliance.
You can find more details in the “Cookies” tab of the bottom window and by exporting from 1Bulk Export›2Web›3All Cookies.
Crawl Path
Unlike the previous reports, you won’t find the “Crawl Path Report” in the main menu.
It’s available by right-clicking a URL in SEO Spider’s top window and selecting 1Export›2Crawl Path Report.
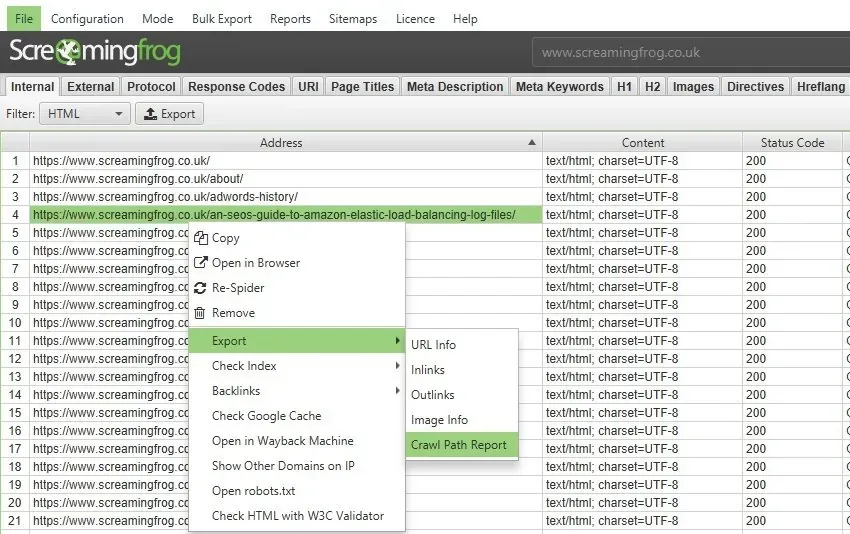
This report shows the shortest path SEO Spider followed during the crawl to discover the URL.
This is very useful for pages with a very deep “Crawl Depth” and saves you from having to look at the ‘inlinks’ of many URLs to find the original source; one use is diagnosing infinite URLs caused by plugins or recurring calendars.
You read the report from the bottom up. The first URL at the bottom of the ‘source’ column is the first URL crawled (level ‘0’).
The ‘destination’ column shows which URLs were crawled next, and these become the ‘source’ URLs for the next level (1), and so on, upwards.
The first URL in the ‘destination’ column, at the top of the report, is the URL the crawl path report is for.
Questions about Reports?
These guides come from real projects. If something in your crawl doesn’t add up, or you want to apply this process to your site, get in touch.
 Author.Raffaele Visintin.Search & Strategic Marketing Advisor
