

Comparing Data from 2 Crawls.
Compare two crawls with Screaming Frog SEO Spider and analyse how crawl data has changed across tabs and filters over time.
How to compare two crawls of the same site to see what has changed over time: new issues, structure, titles, content and links. You need Database Storage mode; then use Compare mode, Change Detection and URL mapping.
The Compare feature
This tutorial explains how to compare two crawls with Screaming Frog SEO Spider and analyse how crawl data has changed across tabs and filters over time.
It lets you track the progress of your optimisations or the trend of SEO issues, with useful granular data on what changed between crawls.
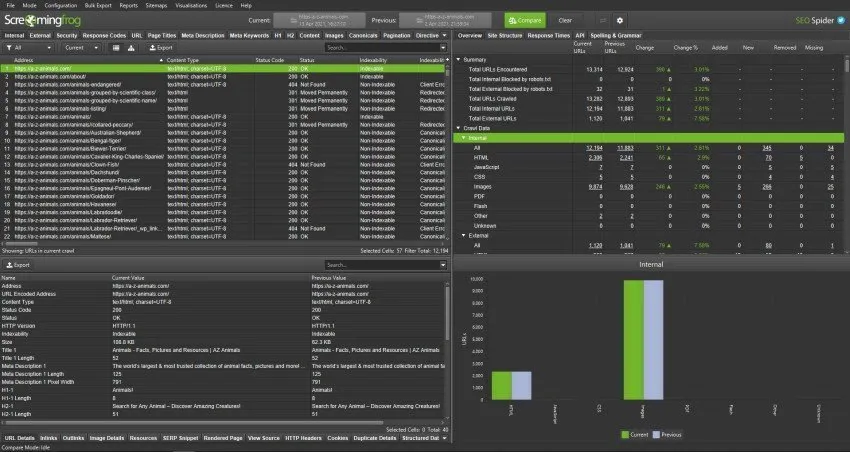
In short, this analysis helps you with several scenarios:
- comparing crawl data and spotting new issues.
- Comparing site structure and changes to directories, pages and crawl depth between crawls.
- Detecting changes to elements and metrics such as page titles, meta descriptions, crawl depth, word count, internal links, content and more.
Database storage
-
- Use database storage mode
To compare crawls you need to store them, by selecting “Database Storage”.
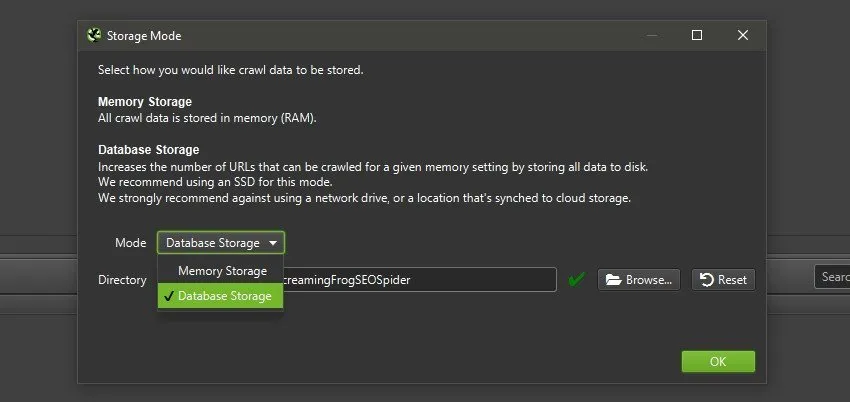
Database storage saves crawls automatically, opens them quickly and keeps several crawls of a project available locally.
Comparing crawls
-
- Select the crawls to compare
To start the comparison, select the crawls from “File > Crawls”, highlight the two crawls by holding ‘Ctrl’ on Windows or ‘Command’ on macOS and click “Select to Compare”, which switches from “Spider” or “List” mode to “Compare” mode.
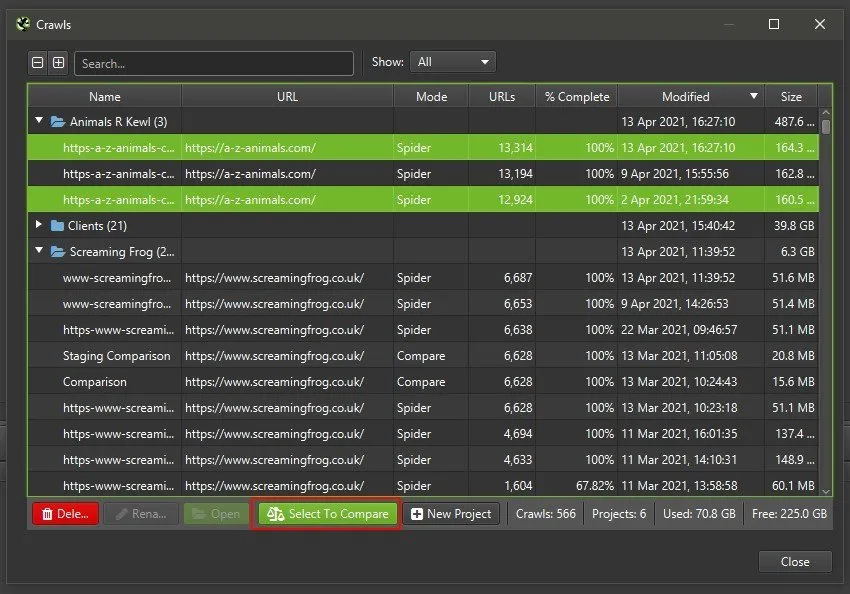
Alternatively, choose “Compare” mode directly from the main menu.
Mode > Compare

Change Detection
-
- Using Change Detection
SEO Spider compares all the crawl data across tabs and filters in the “Overview” tab on the right.
However, you can configure the tool to run an extra analysis of more specific changes to key elements and metrics, such as page title, meta description, H1, word count, crawl depth, internal links, structured data, content and more.
This is useful when an element has changed but hasn’t triggered a filter. For example, a page title could change completely, but this wouldn’t show up unless it triggered a filter such as ‘Missing’, ‘Over X Characters’, ‘Duplicate’ and so on. Change Detection tells you whether an element or metric has changed at all.
In “Compare” mode, open the comparison configuration with “Config > Compare” (or the gear icon at the top) and select the elements and metrics whose changes you want to detect.
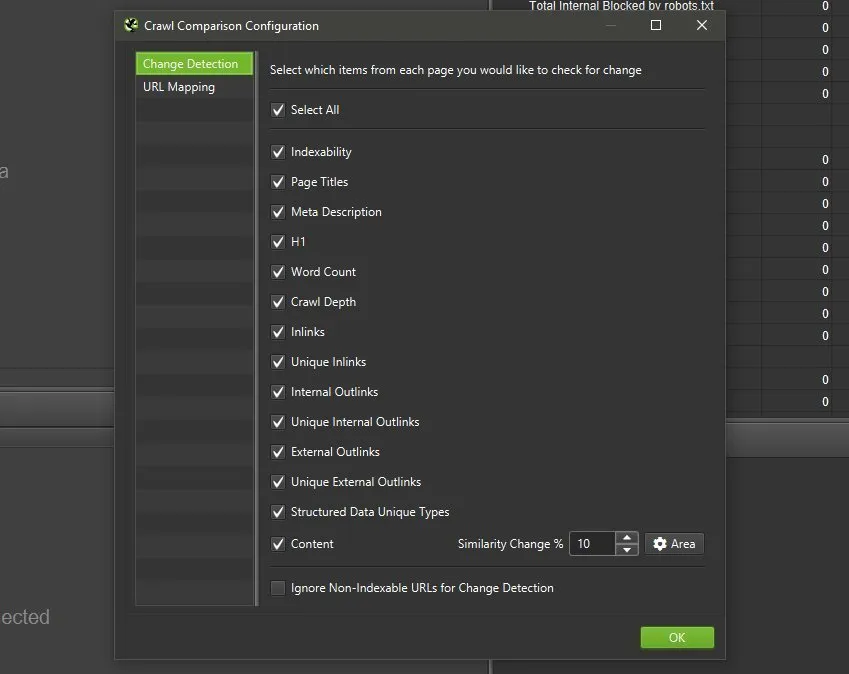
With these options enabled, the crawl results show a new “Change Detection” tab in the main view and in the Overview tab, with filters for every selected element and metric and the details of the changes found.
If you choose this element check, bear in mind SEO Spider needs more resources to process and store the pages’ HTML, analyse their similarity with minhash and work out the % of change between current and previous content.
-
- Start the comparison by clicking “Compare”
Just click “Compare” to run the comparison between the two crawls, based on the Change Detection settings you chose.

Note: SEO Spider uses the most recent crawl as “Current” and the older one as “Previous”, but you can swap them by clicking the arrow next to the gear icon at the top of the interface.
Overview tab
-
- View the “Overview” tab
When the comparison is complete, the Overview tab in the right-hand sidebar fills in with the data and the changes found.
Clicking the tabs updates the charts below, and clicking the filters and the numbers in the columns updates the main window.
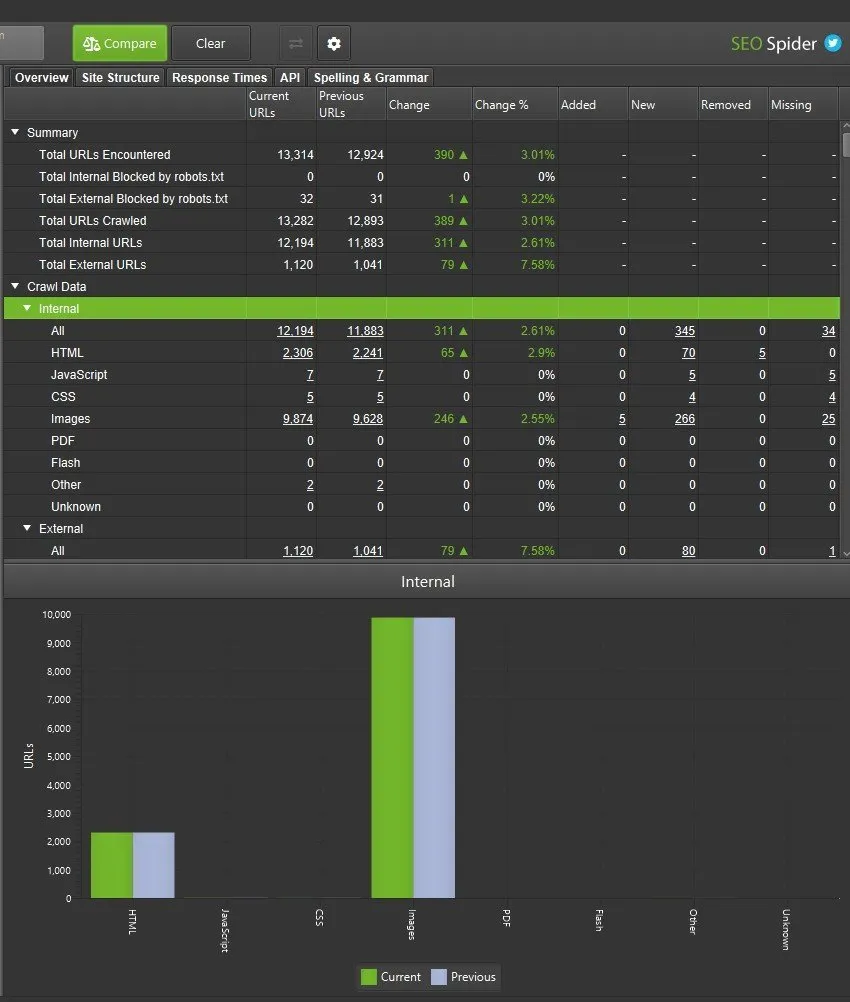
The sidebar has eight columns, while the main window uses 4 filters to segment the URLs that changed across tabs and filters.
- Added: URLs present in both crawls but whose elements now fall into a filter of the “Current” crawl.
For example, a URL had a meta title in the previous crawl but it’s missing in the current one: it will appear in the “Missing” filter of the “Meta Title” element. - New: new URLs that weren’t in the previous crawl but are in the current one.
- Removed: URLs present in both crawls whose elements were in a filter of the previous crawl but not in the same filter of the current one.
Going back to the meta title example, this filter shows the URLs that had no page title and were in the “Missing” filter, but are no longer there in the current crawl because they’ve been fixed. - Missing: URLs present in the previous crawl but not found in the “Current” one.
In short, “added” and “removed” are URLs that exist in both crawls but differ in the filters, while “new” and “missing” are URLs that exist in only one of the crawls. These filters help you work out whether new issues or fixes concern existing URLs or new ones.
Click the numbers in the columns to see which URLs changed, and use the filter in the main window to switch between current and previous crawls, as well as added, new, removed or missing.
The data in the “Overview” sidebar can be exported with the “Crawl Overview” report.

-
- Analyse the changes in the “Change Detection” tab.
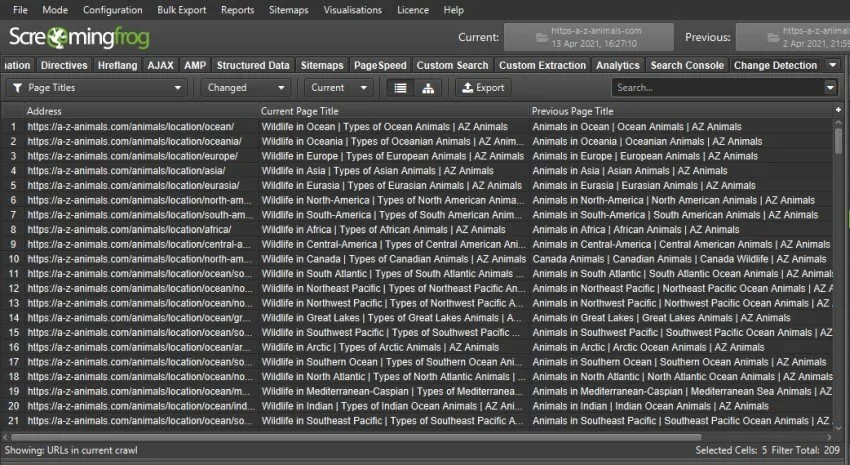
In the example above there are 2,236 URLs in both crawls: 1 URL changed its H1, 209 URLs changed their page title, 6 changed crawl depth, and so on.
To work with this data, click an element to see the changes in the main window. For example, to see page title changes, click the element and compare them side by side in the main tab.
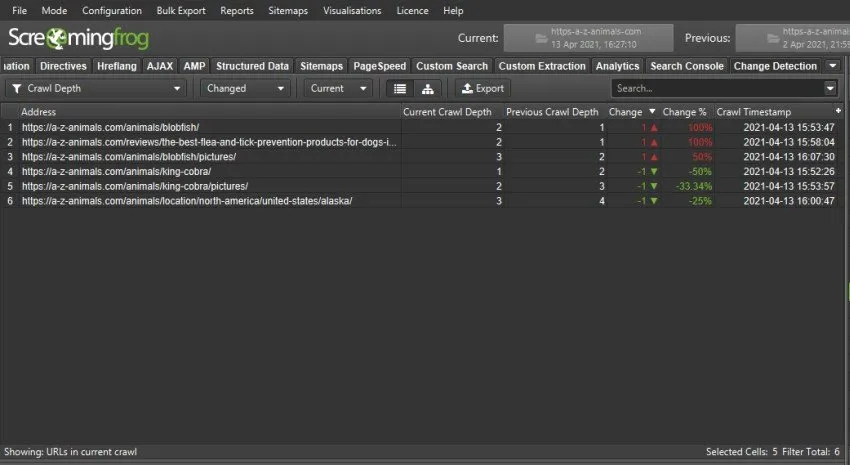
Another use is checking whether the site architecture has changed in terms of crawl depth.
Site structure analysis
-
- View the “Site Structure” tab to examine directories
The “Site Structure” tab shows a tree view of the website’s directories and helps you see how the site architecture evolved between crawls, highlighting any directory changes.
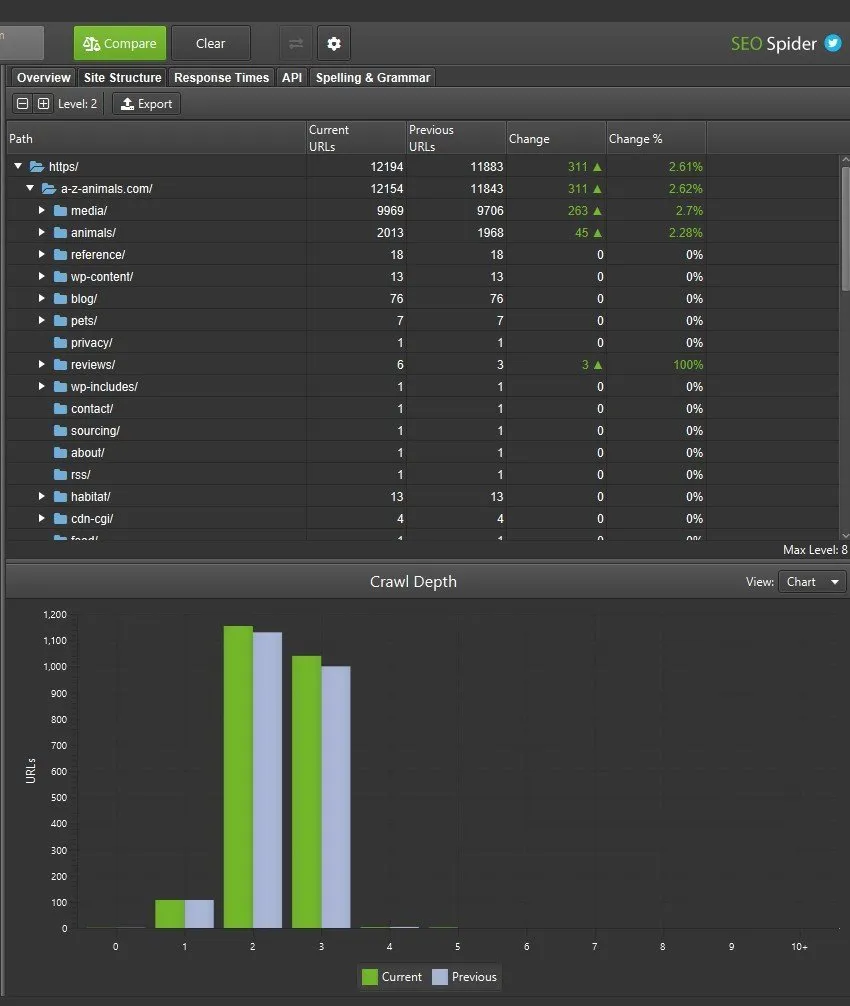
You can also click and expand directories to see which specific URLs changed, as in the reviews directory example. Green up arrows and numbers show added URLs, while red down arrows and numbers show URLs that are now missing.
In our example the reviews directory has 3 new URLs.
Bottom tab analysis
-
- Compare data in the bottom window tabs
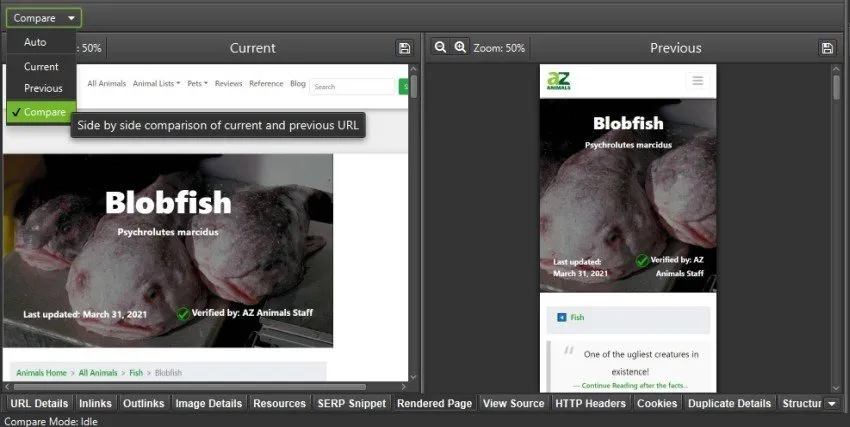
Another way to compare is SEO Spider’s bottom window, where you can see crawl data side by side.
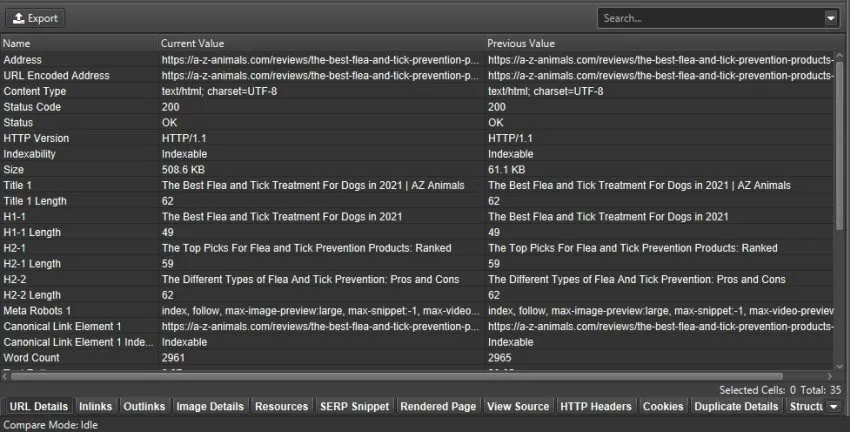
It’s very useful, for example, to compare a crawl of a JavaScript site on desktop and mobile and view the mobile and desktop rendering side by side.
In the bottom window (Inlinks and Outlinks tabs) you also get the extra “Auto” filter, which by default shows link data according to the top window view.
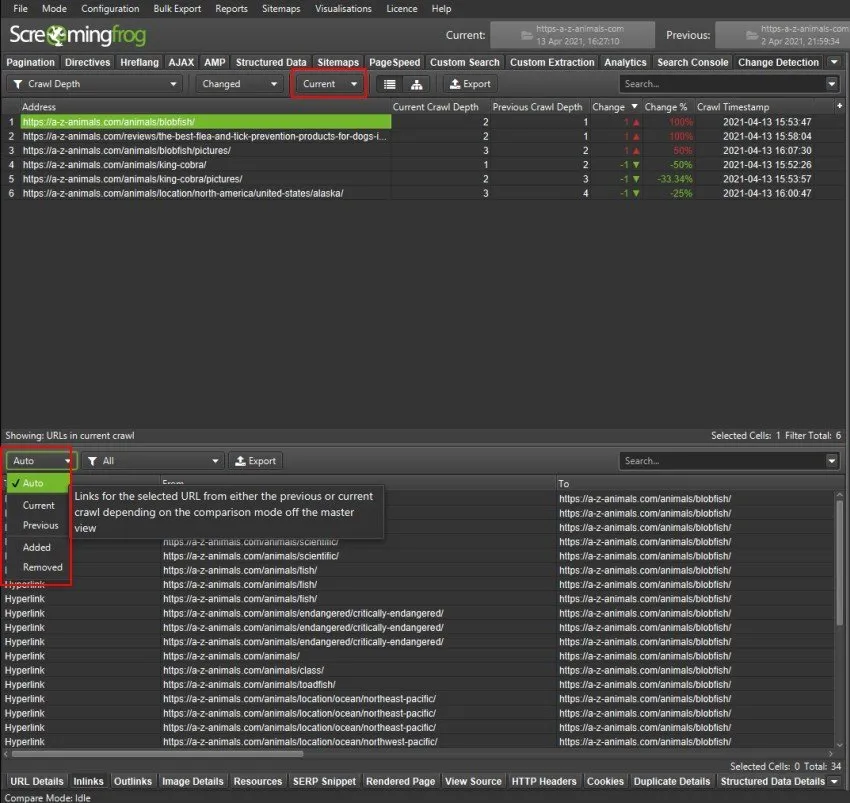
In our example SEO Spider shows link data for the “current” crawl, as selected in the main top window. However, the bottom window can be set independently to show the “previous” crawl’s data, even if the top window shows the current crawl.
You can also use the “Added” and “Removed” filters and highlight the URLs to see where internal links changed.
URL mapping
So far we’ve compared two crawls with the same URLs, but with “URL Mapping” you can also compare crawls of different subdomains. A very common use is comparing a live site with a staging site, or a mobile site with its desktop equivalent. Recent Screaming Frog updates let you compare completely different hostnames, directories or more subtle URL changes.
To compare two different URL structures, open the comparison configuration (“Config > Compare”), click “URL Mapping” and use regex rules for matching.
EXAMPLE:
Let’s see how Screaming Frog moved hosting to Kinsta and tested the staging site before the migration with URL Mapping.
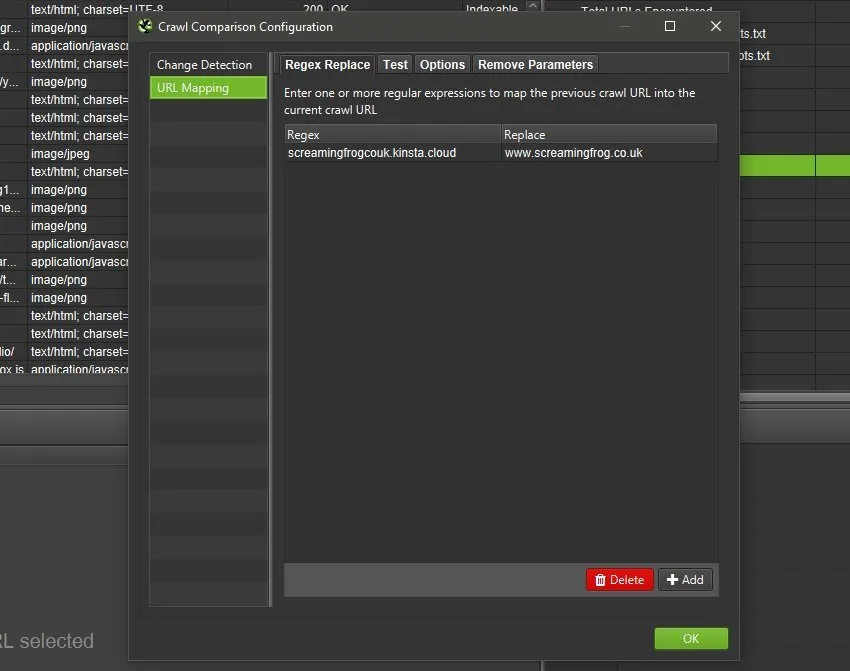
Here the staging site URLs on Kinsta have a different hostname, and mapping matched them to the existing live site so the data could be compared.
Another scenario for URL mapping is comparing mobile and desktop websites when there’s no responsive version.
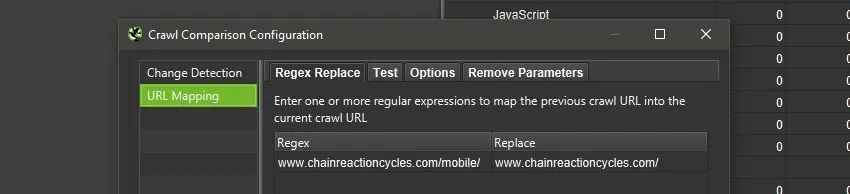
In the example above, the Chain Reaction Cycles website has a /mobile/ subfolder for the smartphone version, so to compare the mobile site with the desktop one, the mobile URLs were mapped to their desktop equivalents with this URL mapping.
Finally, if the two versions only differ by the trailing slash, you can use “/$” in the URL mapping.
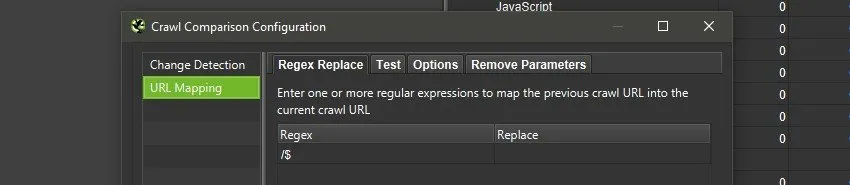
Before applying URL mapping you can test it in the dedicated tab, to avoid mistakes and wasted time.
Crawl comparisons
When the comparison is complete, the data is saved automatically and you can reuse it from “File > Crawls”.
Comparisons are labelled “Compare”.
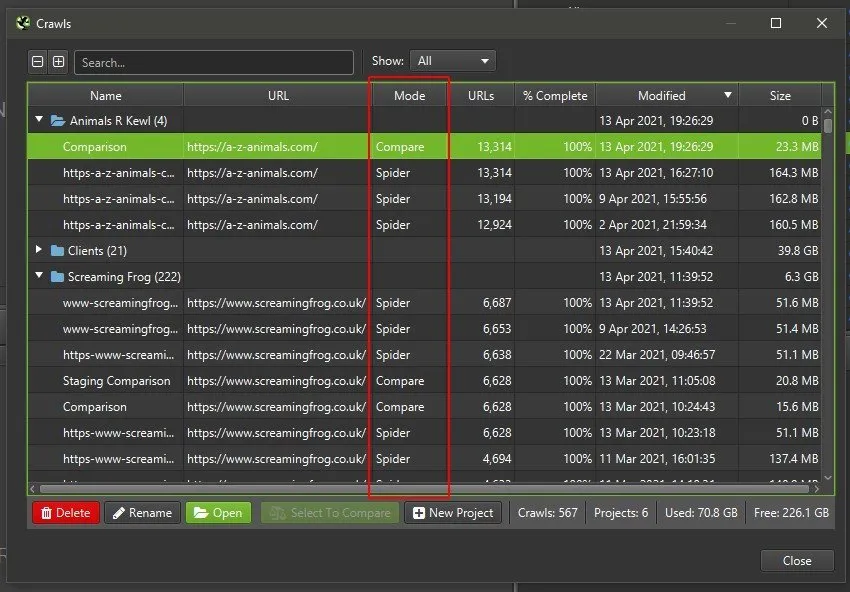
Comparison files use the stored current and previous crawls: if either is deleted, the comparison is no longer available.
Related tabs: Right-hand sidebar | Bottom tabs
Comparing two crawls video
Questions about Comparing Data from 2 Crawls?
These guides come from real projects. If something in your crawl doesn’t add up, or you want to apply this process to your site, get in touch.
 Author.Raffaele Visintin.Search & Strategic Marketing Advisor
